Showing posts with label kids. Show all posts

Wednesday, June 6, 2012

Projects and Ideas- milk jug lid upcycle into memory game or pretend coins

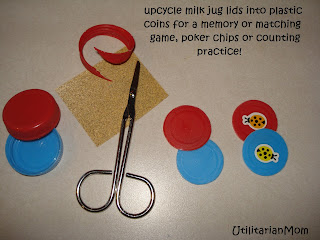
Milk jug lids become pretend coins, poker chips or a memory game- practice counting, play memory  or matching games, sort by color or types of stickers (animals, numbers, cars, etc). 
Collect your old difficult-to-recycle milk jug lids and upcycle them!  Using a sturdy pair of scissors or shears, carefully cut off the threaded edges of the lid, leaving the top coin-shaped piece.  Sand the edges to smooth them out, then add stickers, or draw on numbers or letters with a permanent marker.  Watch young children closely as these small pieces present a choking hazard! 

Tuesday, June 5, 2012

Projects and Ideas- mixing colors with ice


Color Mixing with ice- Fill an old fashioned ice cube tray with water then add 1-2 drops of different colors of food coloring to each cube.  Try to stick to primary colors.  After they freeze, pick two different color ice cubes and put them in a zipper seal bag (tape closed if you have curious children…food coloring will stain).  Let your children push the cubes around inside the bag on the counter, or hold the bag to melt the cubes faster.  Talk about what color combinations result!

Saturday, June 2, 2012

Projects and Ideas- kids' grocery list

Grocery list- a great tool to keep toddlers and preschoolers busy while you shop for groceries.  Find a couple of grocery store ads and cut out pictures of the items you purchase most often.  If your child works well with scissors and glue sticks, they can help- they don’t have to be perfect.  Use a glue stick to attach the pictures to both sides of note cards (preferably used ones or some that your child has found and scribbled on almost every single one).  Write the name of the item on the card with each picture.  Use a hole punch to punch holes in the corner of each one and attach them to a sturdy ring.  During your shopping trip, ask your child to find a picture of the next item you will pick up, or find a picture of a vegetable, something green, or something that starts with the letter C, for example.

Friday, June 1, 2012

Projects and Ideas- towel holder using bulk packaging loops

I hate throwing away plastic, especially plastic loops.  Maybe I'm having flasbacks to all those media images from the 80s and 90s showing poor birds and marine animals with soda loops stuck around their necks.  Our local recycling program is very limited, so I've been really trying to reuse as much as I can.  I finally figured out a way to reuse the thick plastic loops that come on the bulk packages I purchase.  Unfortunately this only keeps one out of landfills (unless you give them to all of your friends), but it is a start.  Now the kids can dry their hands and my kitchen towels don't end up on the floor!  Hooray!

Friday, May 11, 2012

TILTHW- Tiny Diner Placemat

Things I learned the hard way- Consider purchasing a rubber placemat to keep in the diaper bag for travel or restaurants.  I really like the Kiddopotamus Tiny Diner placemat.  It has suction cups on the bottom which work very well on flat smooth tables.  They aren’t as great on tablecloths or wood grain surfaces, but they don’t have to attach to use the placemat.  It also has a small trough to catch dropped food that is soft and flexible enough to seat your child very close to the table.

Tuesday, May 8, 2012

TILTHW- Get rid of the boxes please!

Things I Learned The Hard Way- I’m not exactly sure what genius decided to package infant rice (and other grain) cereal in boxes, but it was a HORRIBLE idea!  Buy the cereal, open the box then dump it all into an empty formula can or plastic or glass container with a large opening at the top.  Canisters sold as flour or sugar storage containers work well for this as long as they seal well.  Toss a clean dry formula scoop on top (most are 1 tablespoon, but make sure ahead of time) and you can easily portion out cereal by the tablespoon.

Monday, May 7, 2012

TILTHW- Quick rice cereal feedings

Things I Learned The Hard Way- When your child starts eating rice cereal, consider portioning out the rice cereal powder ahead of time into small sealed containers or clean plastic baby food containers.  When feeding time arrives, just add water, formula or breastmilk and you are ready to feed.  If you portion out many containers of cereal all at once, it saves a TREMENDOUS amount of time and they are easier to throw in the diaper bag before you head out the door.  Plus, you can do all the prep work filling the containers while the baby sleeps.

Friday, May 4, 2012

TILTHW- Streamline your diaper bag for short trips

Things I Learned The Hard Way- Consider keeping two separate diaper bags; one for short trips (grocery store, etc) and one for longer trips (full afternoon outings, etc).  You won’t have to wrestle with a gigantic bag just to run an errand, or have to repeatedly take out things you don’t need.  It is worth the cost and effort to buy the extra supplies and not have to worry about packing and repacking all the time.

Wednesday, May 2, 2012

TILTHW- Stop the stairclimber workout retrieving tossed toys

Things I Learned The Hard Way- If you have open staircase or patio railings, you can purchase plastic or mesh sheets to secure to the railings to prevent your child from sticking arms and legs (or their heads) through, or throwing toys down.  An inexpensive clear shower curtain liner and zip ties work well for this too.  Just thread the sheet through the rails, alternating which rails you go in front or behind, or thread behind every third or fourth rail depending on their distance apart.  Punch holes with a hole punch and slide a zip tie through to secure.

Tuesday, May 1, 2012

TILTHW- No more missing parts!

Things I Learned The Hard Way- Purchase a plastic or mesh drain cover for the kitchen sink.  It will prevent endless searching for the tiny plastic spoons, bottle parts or breast pump parts that slip down the drain during washing- especially if you have a garbage disposal!

Monday, April 30, 2012

TILTHW- Quick clean-up

Things I Learned The Hard Way- Consider getting plastic bins, baskets or buckets to use while cleaning.  Keep one with cleaning products (carpet cleaner and a cloth for spit up stains, dust cloth, paper towels, glass cleaner, etc).  Take your cleaning basket and an empty bin or basket with you to the first room, pick up everything that doesn’t belong in that room and put it in the empty basket (some of us need large laundry baskets for this).  Finish cleaning the room, then move to the second room.  Take everything out of the catch-all basket that belongs in room #2 and put it away.  Pick up everything in room #2 that doesn’t belong there and place it in the basket.  Complete cleaning room #2 and move on.  This saves valuable time moving from room to room putting things away.  It is also easy if you get interrupted, to put the baskets up out of your child’s reach or in a closet until you can get back to them.

Sunday, April 29, 2012

TILTHW- Hooray for video monitors!

Things I Learned The Hard Way- Consider purchasing or registering for a video monitor with an intercom from the beginning.  You won’t really need the video or intercom aspect early on, but it becomes very useful if you have a climber (you can figure out how they are getting out of the crib), or when you switch up to a toddler or big kid bed (you can tell them to get back in bed when they try to get up repeatedly).  As your child gets older, you may be able to ask them what they need when they awaken at night saying “mommy, mommy, I need you”.  They may just need to hear the sound of your voice and know that you are close by.  Video monitors are also a great way to just watch your sweet baby sleep peacefully or to figure out just what they are doing in their crib when it sounds like a tumbling routine in their room before they fall asleep.  When you no longer need the monitor in the child’s bedroom, you can move it to their play area to keep tabs on them while you use the bathroom, prepare lunch, or throw in a load of laundry!

Saturday, April 28, 2012

TILTHW- baby monitors

Things I Learned The Hard Way- When you purchase or register for a monitor, consider paying a little more for one with two cordless receivers.  You can keep one in your bedroom after the baby moves to their own room and keep the other wherever you spend most of your time (or carry it with you around the house).  If the one you are carrying runs out of batteries or gets broken, you always have an extra.  If your home has two floors, consider keeping one on each level.  If you have two receivers from the beginning, you won’t risk needing to go out and purchase another later.

Friday, April 27, 2012

TILTHW- No more binky hunting in the dark

Things I Learned The Hard Way- If your child takes a pacifier, consider buying multiple extras to sprinkle around in the crib at night.  This increases the likelihood that your infant will be able to find one if they wake up.  You’d be surprised at how early they can actually find one and get it back in their mouth!  This was suggested to me by a friend who is a Pediatric Sleep Specialist and has been a lifesaver for me.  Worst case scenario- they wake up with a pacifier stuck in their ear!

Sunday, December 11, 2011

Projects: Rio Movie Blu And Jewel Costumes

My kids LOVE the movie RIO.  Not just love....but LOVE!!! They talk about it all the time, sing the songs, and pretend to be the characters.  They begged to dress up like Blu and Jewel (the blue macaws from the movie) but I wasn't too excited about making them bird costumes.  If I was going to put in the effort to make them costumes, I wanted them to be cheap, durabl,e and easy to get on and off to play dress up.  They enjoy being able to dress up themselves, and I enjoy not being repetitively asked to help get costumes on and off all day long!  I came up with the idea to make them out of felt partly due to its stiffness and durability, but also (let's be honest here) because it is easy to sew--no
 hems and no fraying!  Here's the scoop...
I started with one yard of blue felt (for a 2-3 year old size costume).  I cut it square, then measured my son's head circumference.  I added 4 inches, then cut a triangle off one corner making sure the bottom of the right triangle (the long side or hypotenuse) was the length of my son's head circumference plus 4.  This small triangle will become the hat.  The rest will become the "cape" or wings and tail.  I cut feather shapes in the cape part and stitched arm sections.  For the hat, I added double layer black felt, cut it into a beak shape, then hand stitched it onto the blue hat.  I added white and brown (for Blu's eyes), and blue (for Jewel's eyes), plus some of the black felt for Jewel's eyelashes.  I used some of
the blue felt scraps for the feathers on the back of the head, and some
white felt and a pink paint marker for Jewel's flower. 
All three kids ADORE these costumes.  They worked great for Halloween and have held up well.  They are easy to spot clean and definitely durable.  We've gotten a little stretch around the arm holes, but it doesn't really affect the fit.  SUCCESS!!
I overestimated how much blue felt I'd need for the project and have some extra left over.  I'm thinking about making some more costumes to sell on Etsy...


Completed Blu Costume

Completed Jewel Hat